In my previous article: Producing PDFs within your Flutter App 1/2 I introduced you to how to generate a PDF document in your Flutter App using the pdf package and viewing it using the easy_pdf_viewer package. Now in this article, I am going to go deeper into how you can do advanced content in your Flutter App.
Problem Statement
Consider a Flutter App that gets items of Student Marks from an API and generates a PDF for the user to view as well as export to whichever place he or she wants to. The first page has a letterhead with an address logo and a few details. The last page also has some information that is unique to it like the date and signature.

Creating of Pages
Based on the statement problem we will need to create 3 types of pages for a PDF. The reason is that the PDF package doesn't allow content to overflow to the next page. If content exceeds the current page it normally ends up being a blank page.
Background/Letterhead
Front Page
Recurring Page
Last Page
How to Add a Background/Letterhead to your PDF
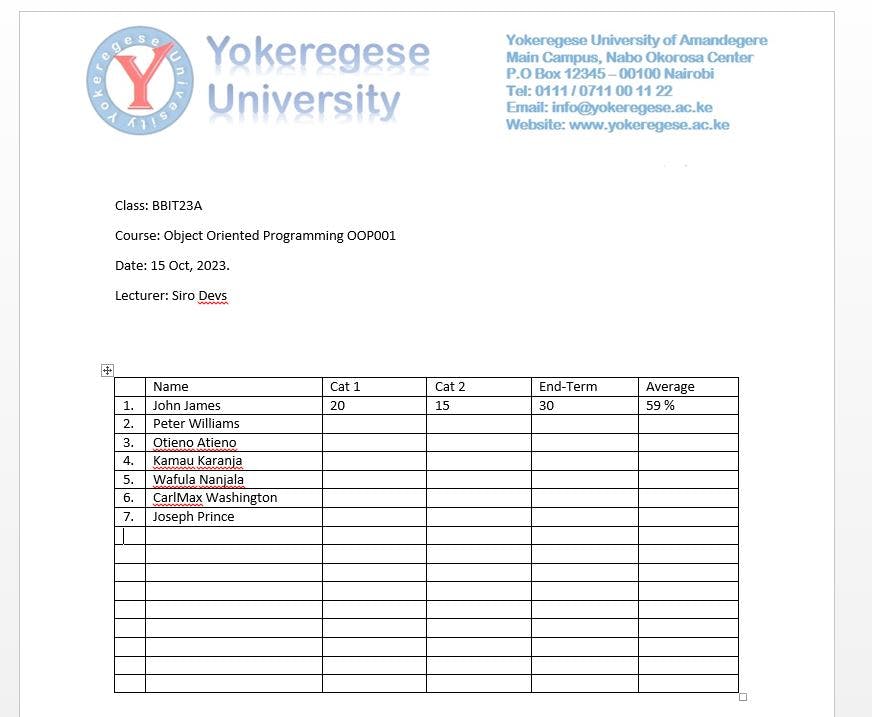
Consider a background image (header_footer.jpg) that we can use as a background for our PDF page to allow us to add other content on top of it as in the image above. This can be useful for creating PDFs with a branded or customized look. Here is how we go about it:
Loading Your Image from Assets:
 final ByteData bytesImage = await rootBundle.load('assets/images/header_footer.jpg');
 final Uint8List bgBytes = bytesImage.buffer.asUint8List();
This code uses
rootBundleto load the image file (header_footer.jpg) from the assets folder.The image is loaded as
ByteDataand then converted to aUint8ListnamedbgBytesthat represents the bytes of the image.
Adding your Image as a Background to your Page:
 build: (pw.Context context) {
   return pw.Container(
     padding: const pw.EdgeInsets.symmetric(horizontal: 15),
     decoration: pw.BoxDecoration(
       image: pw.DecorationImage(
         fit: pw.BoxFit.cover,
         image: pw.MemoryImage(bgBytes),
       ),
     ),
     child: pw.Column(),
   );
 },
Inside the
buildfunction, apw.Containeris created as the main content of the page.The container has padding and a decoration. The decoration includes an image as the background using
pw.MemoryImage(bgBytes).
Adding Additional Content
 child: pw.Column(
   mainAxisAlignment: pw.MainAxisAlignment.start,
   crossAxisAlignment: pw.CrossAxisAlignment.start,
   children: [
     pw.SizedBox(height: 120),
     // Additional content can be added here...
   ],
 ),
The child widget of the container a
pw.Columnwill used to organize content vertically.You will have to add something like a
pw.SizedBoxto create some empty space at the top of the page (height: 120).Additional content can be added to the
Columnto customize the page further.
Adding Some Text and Table Content to Your PDF
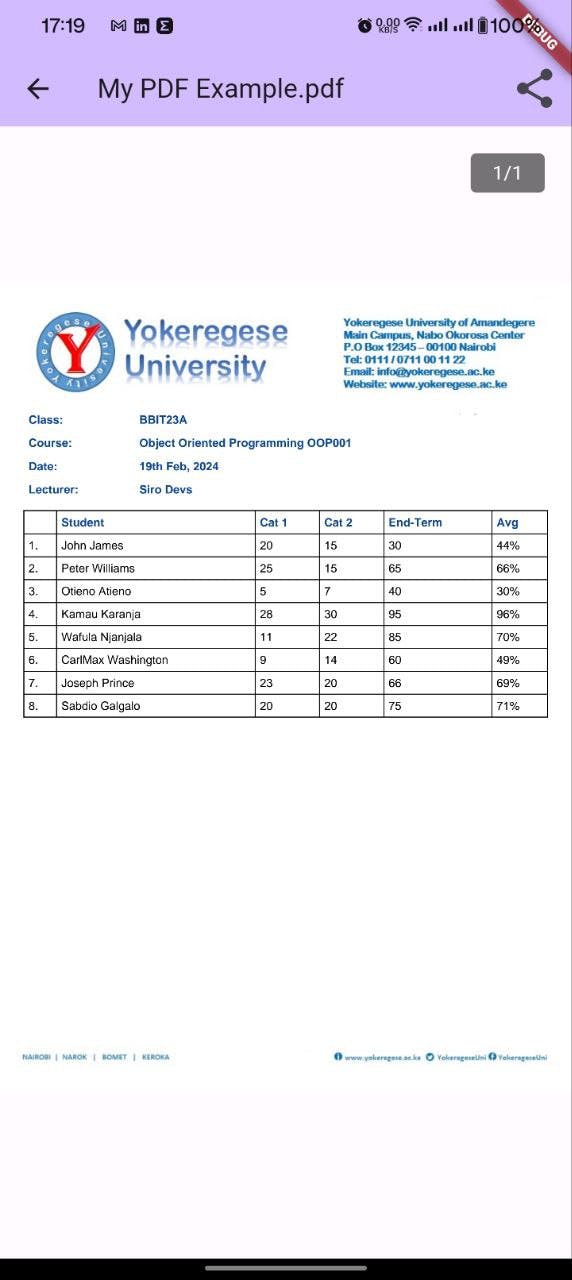
First before we can go into design a front page, a recurring page and a last page, we could first of all try and reproduce a PDF page that looks exactly as the one in the image I showed you earlier up there. It comprises of some introductory text as well as a table of 9 columns and 6 rows. Our column can be modified as below:
pw.Column(
  mainAxisAlignment: pw.MainAxisAlignment.start,
  crossAxisAlignment: pw.CrossAxisAlignment.start,
  children: [
    pw.SizedBox(height: 120),
    introductionTexts,
    pw.SizedBox(height: 10),
    tableWidget,
  ],
),
Defining our TextStyles
     pw.TextStyle textStyle1 = const pw.TextStyle(fontSize: 12);
     pw.TextStyle textStyle2 = pw.TextStyle(
         fontSize: 12, color: PdfColors.blue900, fontWeight: pw.FontWeight.bold);
We go ahead to define pw.TextStyle for simple text textStyle1 and textStyle2 for decorated text which has color and font weight. This 2 variables will be useful in the next lines of code we are going to write to ensure we write clean code.
Create a Reusable Text Widget
We will need to create a reusable text widget so that continue to maintain clean code. This widget will be used in the table cells.
 pw.Widget textItem({
   required String title,
   pw.TextStyle style = const pw.TextStyle(fontSize: 30),
 }) {
   return pw.Padding(
     padding: const pw.EdgeInsets.all(5),
     child: pw.Text(title, style: style),
   );
 }
Defining the Introductory Texts
Our code that is going to produce the introductory texts is as below:
pw.Table introductionTexts = pw.Table( children: [ pw.TableRow( children: [ pw.Column( mainAxisAlignment: pw.MainAxisAlignment.start, crossAxisAlignment: pw.CrossAxisAlignment.start, children: [ textItem(title: 'Class:', style: textStyle2), textItem(title: 'Course:', style: textStyle2), textItem(title: 'Date:', style: textStyle2), textItem(title: 'Lecturer:', style: textStyle2), ], ), pw.Column( mainAxisAlignment: pw.MainAxisAlignment.start, crossAxisAlignment: pw.CrossAxisAlignment.start, children: [ textItem(title: 'BBIT23A', style: textStyle2), textItem( title: 'Object Oriented Programming OOP001', style: textStyle2, ), textItem(title: getCurrentDayDate(), style: textStyle2), textItem(title: 'Siro Devs', style: textStyle2), ], ), ], ), ], );pw.Tablewidget is used to create a table in the PDF document.pw.TableRowwidget represents a row in the table.Inside the
pw.TableRow, there are twopw.Columnwidgets, each representing a column in the table.Inside each column, there are multiple custom widgets:
textItemto display text items.The first
pw.Columncontains text items for 'Class:', 'Course:', 'Date:', and 'Lecturer:', and the secondpw.Columncontains corresponding values for these items.
Defining the Table of Values
We will first of all define
List<pw.TableRow> rowItem.This creates an empty list to storepw.TableRowobjects to be used later inside our table's children widgets.List<pw.TableRow> rowItems = [];The first
pw.TableRowadded torowItemswill represent the header row of the table, containing titles such as 'Student', 'Cat 1', 'Cat 2', 'End-Term', and 'Avg'.rowItems.add( pw.TableRow( children: [ textItem(title: '', style: textStyle2), textItem(title: 'Student', style: textStyle2), textItem(title: 'Cat 1', style: textStyle2), textItem(title: 'Cat 2', style: textStyle2), textItem(title: 'End-Term', style: textStyle2), textItem(title: 'Avg', style: textStyle2), ], ), );Then we will proceed to use a
forloop to iterate over a list ofStudentobjects (students). For each student, a newpw.TableRowis created and added torowItems.for (int i = 0; i < students.length; i++) { Student student = students[i]; int avg = (((((student.cat1 + student.cat2) / 60) * 100) + student.endterm) / 2) .round(); rowItems.add( pw.TableRow( children: [ textItem(title: '${(i + 1)}.', style: textStyle1), textItem(title: student.name, style: textStyle1), textItem(title: student.cat1.toString(), style: textStyle1), textItem(title: student.cat2.toString(), style: textStyle1), textItem(title: student.endterm.toString(), style: textStyle1), textItem(title: '$avg%', style: textStyle1), ], ), ); }Within each
pw.TableRowfor students, information such as the student's name, scores for 'Cat 1', 'Cat 2', and 'End-Term' are displayed. Additionally, an average percentage is calculated and displayed in the 'Avg' column.The calculated average (
avg) is determined by adding up the percentages of 'Cat 1' and 'Cat 2', converting it to a scale of 0-100, adding the 'End-Term' percentage, and then dividing by 2. The result is rounded to the nearest whole number.The
textItemwidget is used to create individual cells with specified styles (textStyle1ortextStyle2) for the contents.
    var tableWidget = pw.Table(
      border: pw.TableBorder.all(),
      children: rowItems,
    );
Finally, a pw.Table widget is created using rowItems as its children. The table has borders around each cell (pw.TableBorder.all()).
The results of our work after all is done will look as below. Congratulations on producing a PDF that has a background/letterhead with some texts on it and a table of values.

Producing Recurring Pages for your PDF
Now supposing you had like 400 rows to show on your table we would still do things the same way we did here except that you will have to handle page breaks.
To handle page breaks, you can create multiple tables and add them to separate pages.
Determine the number of rows to display per page based on your layout and content.
dartCopy codefinal rowsPerPage = 30; // Adjust this based on your layout
final pageCount = (rowItems.length / rowsPerPage).ceil();

for (int i = 0; i < pageCount; i++) {
  final startIndex = i * rowsPerPage;
  final endIndex = (i + 1) * rowsPerPage;
  final currentRows = rowItems.sublist(startIndex, endIndex);

  pdf.addPage(
    pw.Page(
      build: (pw.Context context) {
        return pw.Table(
          border: pw.TableBorder.all(),
          children: currentRows,
        );
      },
    ),
  );
}
Conclusion
As we advance further from just writing widgets that are specific to PDF it is important that we thread carefully to ensure the output is not far from the desired one. You might have to do a lot of trials to get it all right.
You can find the source code for the app I built when writing this tutorial on Github:
See you in the next article on something else. Happy Coding!


